CDN Integration with WordPress
CDN Integration with WordPress, How ? Content Delivery Network is now very important in web, Now days speed is more important, CDN will improve the site performance and reduce your server load.
CDN Integration with WordPress is very simple and its more efficient for site performance. This article will help you guys to setup the CDN with cache plugin. In WordPress many cache plugins are available I will explain with WP Super Cache. with this plugin you can simple set your CDN URL in WordPress and all your assets like Css,Js and Images will load from CDN server.
The most commonly used CDN are .
- EdgeCast.
- Max CDN
- AWS CDN.
- more.
First you have to download and install the WP Super Cache Plugin. If you are already using any other caching plugin like W3 Total cache or something it may have this CDN setting options If not Please use this plugin. Also W3 Total cache already have Max CDN integration option.
CDN Integration with WordPress
Once you setup the CDN server with your domain and other configuration. After install the Cache plugin go to.
Admin Login -> Settings -> WP super cache (Or any other cache plugin you are using) -> CDN Tab.
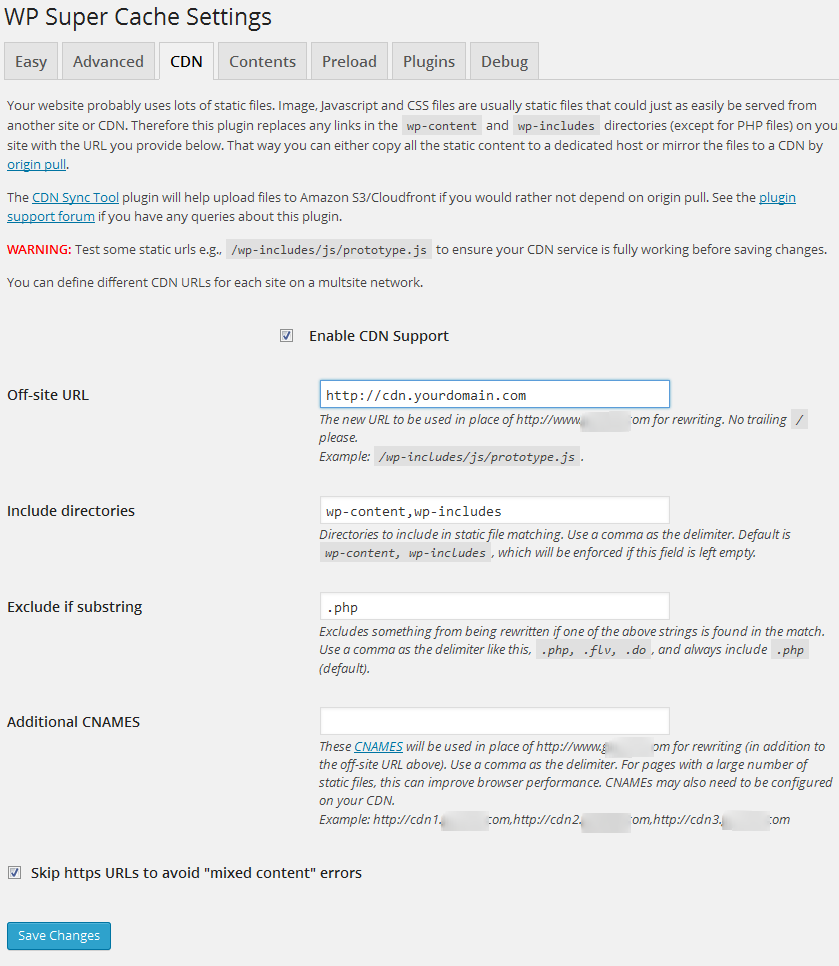
Just enable the checkbox Enable CDN Support, Then setup your Off line URL with CDN prefix, here I used “cdn” as a prefix for the URL. so my off line url will look like.
http://cdn.yourdomain.com
If you are using additional CNAMES you have option to configure them too. then finally check the Skip https URLs to avoid “mixed content” errors checkbox too.
Simply save and check the site front end now you can see all your assets loading from your CDN URL. Yes its Done.!
Note:One important thing while working with CDN in WordPress or Joomla you may face some font icon missing issue , the quick fix for font icon missing with CDN in WordPress and Joomla are .
Method 1Font awesome is main issue with CDN you can use Cloudfare library.
//cdnjs.cloudflare.com/ajax/libs/font-awesome/4.1.0/css/font-awesome.css
//cdnjs.cloudflare.com/ajax/libs/font-awesome/4.1.0/css/font-awesome.min.css
//cdnjs.cloudflare.com/ajax/libs/font-awesome/4.1.0/fonts/FontAwesome.otf
//cdnjs.cloudflare.com/ajax/libs/font-awesome/4.1.0/fonts/fontawesome-webfont.eot
//cdnjs.cloudflare.com/ajax/libs/font-awesome/4.1.0/fonts/fontawesome-webfont.svg
//cdnjs.cloudflare.com/ajax/libs/font-awesome/4.1.0/fonts/fontawesome-webfont.ttf
//cdnjs.cloudflare.com/ajax/libs/font-awesome/4.1.0/fonts/fontawesome-webfont.woff
font -awesome missing icons with CDN using htaccess fix, add the following code in your htaccess file.
<IfModule mod_headers.c>
<FilesMatch "\.(ttf|ttc|otf|eot|woff|font.css)$">
Header set Access-Control-Allow-Origin "*"
</FilesMatch>
</IfModule>
Edit your template header.php file and add your font.css locally from your server after the
<?php wp_head();?> simply add it like,
<link href="http://www.yourdomain.com/font-awesome/4.1.0/css/font-awesome.min.css" rel="stylesheet">I hope this article will help you to setup CDN integration with WordPress also it will help to fix the common issue like font awesome icon missing for your CDN integration.
One thought on “CDN Integration with WordPress”
thankyou very much it works