Joomla Module Development tutorial
Joomla is a powerful CMS and widely used for many web applications like shopping cart, blogs , classifieds etc.This tutorial gives a brief details about the smallest unit(Module) in the joomla .How to create Joomla Module that are compatible for most of the version. Joomla module development tutorial provides a guide line for creating modules for Joomla 1.6, Joomla 1.7 , Joomla 2.5 and Joomla 3.
The Joomla 1.5 version is older and now Joomla stops its support, so here I am not explaining an out dated version of Joomla modules creation. The Joomla module is a smallest code unit that can be used in different places and call multiple time in a single template view also Joomla module have lot of options Joomla providing like parameters page rendering conditions etc.
We can start from the beginning How to create Joomla module or How to Joomla Module Development tutorial learn step by step.Here i just explain the Joomla module development tutorial with one sample module Its a social networking plugin that gives the administrator to give the follow urls from back end and it will appear on the template position.

Joomla module development tutorial
First of all create a folder with mod_socialnetworking name and have the following folder and file structure.
mod_socialnetworking.xml
mod_socialnetworking.php
index.html
helper.php
---tmpl/default.php //create a folder tmpl inside your mod_socialnetworking folder
---assets/images/social_icons.png //create a folder assets inside your mod_socialnetworking folder
---assets/css/mod_socialnetworking.css
---tmpl/index.html
Then inside your mod_socialnetworking.xml have the following code.
<?xml version="1.0" encoding="utf-8"?>
<install type="module" version="1.7">
<name>Social Networking plugin</name>
<author>Jobin Jose</author>
<version>1.7.0</version>
<description>Social Networking plugin.</description>
<files>
<filename>mod_socialnetworking.xml</filename>
<filename module="mod_socialnetworking">mod_socialnetworking.php</filename>
<filename>index.html</filename>
<filename>helper.php</filename>
<filename>tmpl/default.php</filename>
<filename>assets/images/social_icons.png</filename>
<filename>assets/css/mod_socialnetworking.css</filename>
<filename>tmpl/index.html</filename>
</files>
<config>
<fields name="params">
<fieldset name="basic">
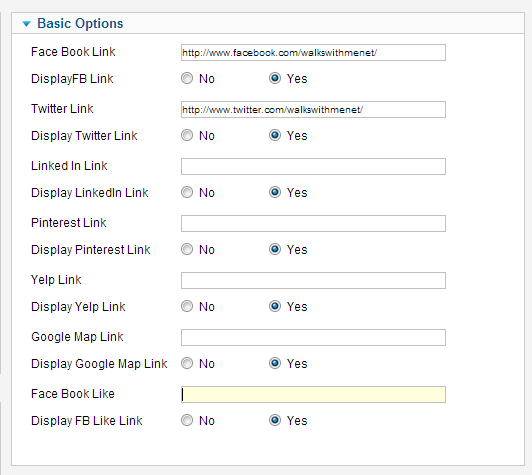
<field name="face_book_link" type="text" default="" label="Face Book Link " description="Face Book Link" size="60"/>
<field name="face_book_link_yes" type="radio" default="1" label="DisplayFB Link" description="DisplayFB Link">
<option value="0">No</option>
<option value="1">Yes</option>
</field>
<field name="twitter_link" type="text" default="" label="Twitter Link " description="Twitter Link" size="60"/>
<field name="twitter_link_yes" type="radio" default="1" label="Display Twitter Link" description="Display Twitter Link">
<option value="0">No</option>
<option value="1">Yes</option>
</field>
<field name="linkedin_link" type="text" default="" label="Linked In Link " description="Linked In Link" size="60"/>
<field name="linkedin_link_yes" type="radio" default="1" label="Display LinkedIn Link" description="Display LinkedIn Link">
<option value="0">No</option>
<option value="1">Yes</option>
</field>
<field name="pinrest_link" type="text" default="" label="Pinterest Link " description="Pinterest Link" size="60"/>
<field name="pinrest_link_yes" type="radio" default="1" label="Display Pinterest Link" description="Display Pinterest Link">
<option value="0">No</option>
<option value="1">Yes</option>
</field>
<field name="yelp_link" type="text" default="" label="Yelp Link " description="Yelp Link" size="60"/>
<field name="yelp_link_yes" type="radio" default="1" label="Display Yelp Link" description="Display Yelp Link">
<option value="0">No</option>
<option value="1">Yes</option>
</field>
<field name="google_map_link" type="text" default="" label="Google Map Link " description="Google Map Link" size="60"/>
<field name="google_map_link_yes" type="radio" default="1" label="Display Google Map Link" description="Display Google Map Link">
<option value="0">No</option>
<option value="1">Yes</option>
</field>
<field name="face_book_like" type="text" default="" label="Face Book Like " description="Face Book Like" size="60" />
<field name="face_book_like_yes" type="radio" default="1" label="Display FB Like Link" description="Display FB Like Link">
<option value="0">No</option>
<option value="1">Yes</option>
</field>
</fieldset>
</fields>
</config>
<params></params>
</install>
And in your mod_socialnetworking.php have the following codes.
defined( '_JEXEC' ) or die( 'Restricted access' );
require_once( dirname(__FILE__).DS.'helper.php' );
$SocialNetWrokingParams = modHomeSocialNetworking::getData($params);
require( JModuleHelper::getLayoutPath( 'mod_socialnetworking' ) );
And in your helper.php have the following code.
class modHomeSocialNetworking
{
function getData(&$params){
$SocialNetWrokingParams = array();
$SocialNetWrokingParams['face_book_link'] = $params->get( 'face_book_link' );
$SocialNetWrokingParams['twitter_link'] = $params->get( 'twitter_link' );
$SocialNetWrokingParams['linkedin_link'] = $params->get( 'linkedin_link' );
$SocialNetWrokingParams['pinrest_link'] = $params->get( 'pinrest_link' );
$SocialNetWrokingParams['yelp_link'] = $params->get( 'yelp_link' );
$SocialNetWrokingParams['google_map_link'] = $params->get( 'google_map_link' );
$SocialNetWrokingParams['face_book_like'] = $params->get( 'face_book_like' );
//display params
$SocialNetWrokingParams['face_book_link_yes'] = $params->get( 'face_book_link_yes' );
$SocialNetWrokingParams['twitter_link_yes'] = $params->get( 'twitter_link_yes' );
$SocialNetWrokingParams['linkedin_link_yes'] = $params->get( 'linkedin_link_yes' );
$SocialNetWrokingParams['pinrest_link_yes'] = $params->get( 'pinrest_link_yes' );
$SocialNetWrokingParams['yelp_link_yes'] = $params->get( 'yelp_link_yes' );
$SocialNetWrokingParams['google_map_link_yes'] = $params->get( 'google_map_link_yes' );
$SocialNetWrokingParams['face_book_like_yes'] = $params->get( 'face_book_like_yes' );
return $SocialNetWrokingParams;
}
}
And Finally in your default.php file have the following code.
<?php // no direct access
defined( '_JEXEC' ) or die( 'Restricted access' );
$document = JFactory::getDocument();
$document->addStyleSheet(JURI::root()."modules/mod_socialnetworking/assets/css/mod_socialnetworking.css");
?>
<div class="social_share_plugin">
<div class="follow_us">
<h6 class="font10">FOLLOW US</h6>
<ul class="social">
<?php if($SocialNetWrokingParams['face_book_link_yes']==1):?>
<li class="facebook"><a href="<?php echo $SocialNetWrokingParams['face_book_link'];?>" target="_blank"></a></li>
<?php endif; ?>
<?php if($SocialNetWrokingParams['twitter_link_yes']==1):?>
<li class="twitter"><a href="<?php echo $SocialNetWrokingParams['twitter_link'];?>" target="_blank"></a></li>
<?php endif; ?>
<?php if($SocialNetWrokingParams['linkedin_link_yes']==1):?>
<li class="likedin"><a href="<?php echo $SocialNetWrokingParams['linkedin_link'];?>" target="_blank"></a></li>
<?php endif; ?>
<?php if($SocialNetWrokingParams['pinrest_link_yes']==1):?>
<li class="pinit"><a href="<?php echo $SocialNetWrokingParams['pinrest_link_yes'];?>" target="_blank"></a></li>
<?php endif; ?>
<?php if($SocialNetWrokingParams['yelp_link_yes']==1):?>
<li class="yelp"><a href="<?php echo $SocialNetWrokingParams['yelp_link'];?>" target="_blank"></a></li>
<?php endif; ?>
<?php if($SocialNetWrokingParams['google_map_link_yes']==1):?>
<li class="locate"><a href="<?php echo $SocialNetWrokingParams['google_map_link'];?>" target="_blank"></a></li>
<?php endif; ?>
</ul>
<div class="clear"></div>
</div>
<?php if($SocialNetWrokingParams['face_book_like_yes']==1){?>
<div class="like_us">
<h6 class="font10">LIKE US</h6>
<iframe src="//www.facebook.com/plugins/like.php?href=<?php echo $SocialNetWrokingParams['face_book_like'];?>e&width=75&height=21&colorscheme=light&layout=button_count&action=like&show_faces=false&send=false&appId=165519893567731" scrolling="no" frameborder="0" style="border:none; overflow:hidden; width:75px; height:21px;" allowTransparency="true"></iframe>
</div>
<?php } ?>
</div>
The assets folder should have the share_icon image and css file for your Joomla module. and the index.html is just for prevent direct access.
Joomla Module Development tutorial
Then finally just zip your folder structure and install via Joomla extension menu. upload your zip file and install the module after that just enable the module and set your template position.
Joomla Module Development tutorial
Yes you have done Joomla Module Development tutorial and its compatible for Joomla 1.6+ version are you happy ? 🙂 🙂 🙂
Would you like to download the module ?
14 thoughts on “Joomla Module Development tutorial”
Where you store the info and where? I don’t understand this.
Thanks.
The information is stored in Joomla module’s table itself as Json object.
Thankx
Do you have any informations about the file structure to use SQL databases ?
for more information
No way! Just copy and paste this code and you’re done? Talk about a tutorial!!! Might as well have downloaded any other joomla module and checked the code out.
Is this module uses any database?
No, It do not use any Database Query its just save the parameters as module param,
So it will keep the data in Joomla default extension table.
It was really good and useful. Thnx!
Awesome tutorial! Thanks for sharing. I added languages to my custom version.
I think it should be possible to prefix the URLs so that the administrator only need to fill in the username for the social media account. I did a similar one before but not with many URLs. I’ll try and post my code here.
Very nice work, but i have a problem when the type of field is “editor”.
Works fine on back end but i can’t make it appear on frond end…
Any help?
Joomla is a powerful CMS and its used for making many web application.This blog provide us the joomla tutorial
Wow… very vital tutorial. It’s quite informative.
I’m requesting you to guide me on how to add textarea fields like the one on the custom module.
I have tried to figure it out but am really failing, I don’t get it.
Thank you
Try this,
<field name=’moduleclass_sfx’ type=’textarea’ rows=’3′ label=’label’ description=’description’ / >
Hope its works..